
DevOps — Infrastructure Provisioning Automation using Terraform
By Raj Shivage / Jul 06,2022
Terraform is an open-source Infrastructure as Code (IaC) software tool created by HashiCorp. It allows to build, update and delete infrastructure safely, efficiently, and in a repeatable manner. With Terraform, we can define resource configurations in the file(s), which we can version, reuse and share with others.
Using Terraform, we can define resources and infrastructure in human-readable, declarative configuration files and manage the infrastructure’s lifecycle.
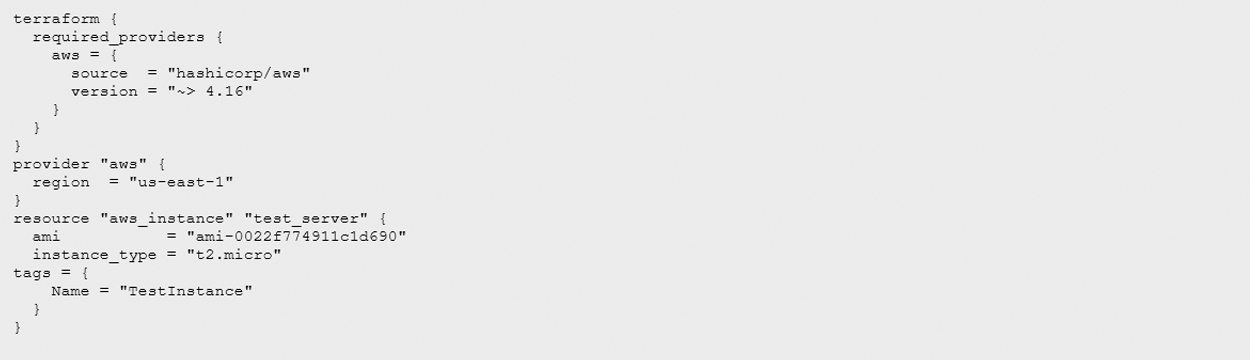
Example Terraform file for provisioning an EC2 instance in AWS in the us-east-1 region.
Terraform has several advantages over manually deploying and managing infrastructure.
- The human-readable configuration language is easy to learn.
- The declarative configuration language helps you write infrastructure code quickly.
- Terraform’s state allows you to track changes made to resources and safely update the cloud resources.
- You can commit your configurations to version control and collaborate with others on infrastructure deployments.
- Terraform can manage infrastructure on multiple cloud platforms. It supports all major cloud platforms e.g. AWS, GCP, and Azure.

Now let’s dive into actual code and infrastructure deployment using Terraform.
First thing first, let’s install Terraform.
Install Terraform
I am a big fan of Linux. So I am using Amazon Linux 2 image for my EC2 instance. Let’s see the Terraform installation on Amazon Linux 2.

Now we have a successful installation of Terraform. Let’s build and deploy the infrastructure.
For installation on other OSes, you find the procedure here
https://learn.hashicorp.com/tutorials/terraform/install-cli?in=terraform/aws-get-started
Deploy Infrastructure
Now, let’s build and deploy something on the AWS cloud. I will provision an EC2 instance on Amazon Web Services (AWS). EC2 instance (virtual machines) is a compute component of AWS.
Prerequisites
- The Terraform CLI (1.2.0+) installed. We have already installed it on the EC2 instance.
- The AWS CLI is installed on EC2. The installation steps you find here https://docs.aws.amazon.com/cli/latest/userguide/getting-started-install.html
- AWS account and associated credentials that allow you to create resources.
To use your IAM credentials to authenticate the Terraform AWS provider, set the AWS_ACCESS_KEY_ID and AWS_SECRET_ACCESS_KEYenvironment variables.

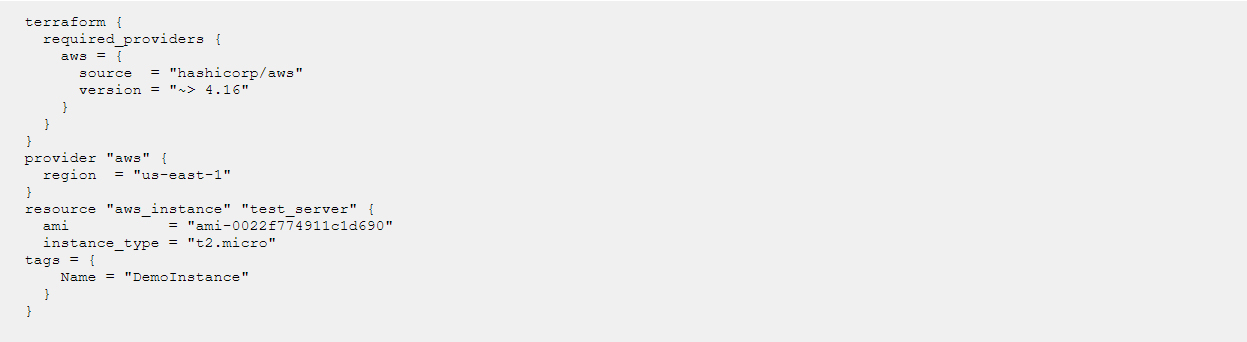
The set of files used to describe infrastructure in Terraform is known as a Terraform configuration. I will write our first configuration file to define a single AWS EC2 instance. Each Terraform configuration must be in its working directory. Create a directory for your configuration.

Open main.tf in VI or any other text editor, paste the lines below, and save the file.
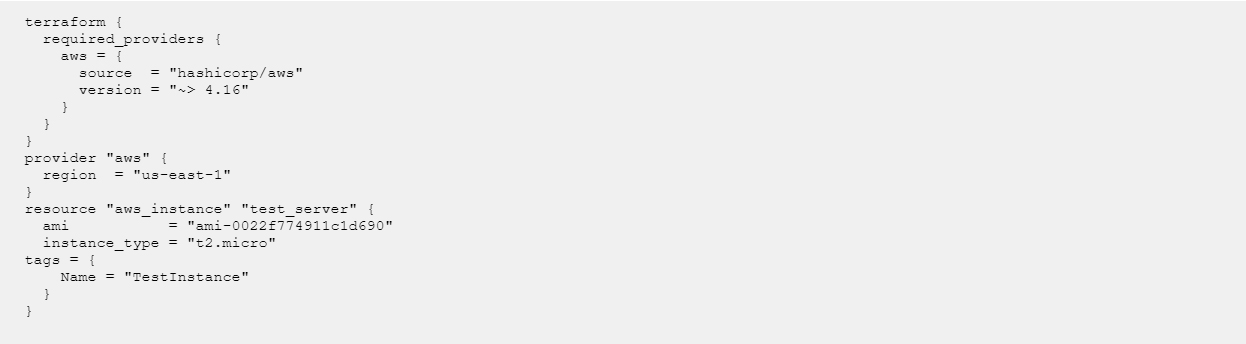
It is our first Terraform configuration file. ????
Initialize the directory
The next step is we have to initialize the directory. When we create a new configuration file or check out an existing configuration from version control, we have to initialize the directory with terraform init.
Terraform init downloads and installs the providers defined in the configuration, which in this case is the aws provider.
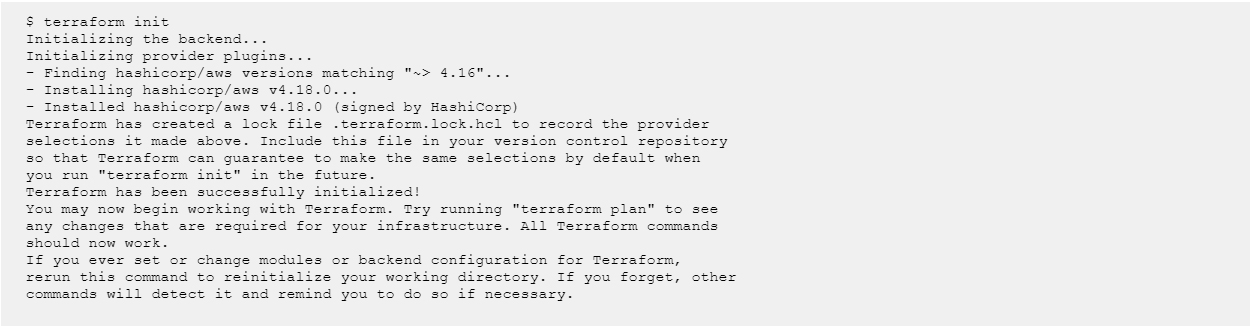
Terraform downloads the AWS provider and installs it in a hidden subdirectory of our current working directory, named .terraform. The terraform init command prints out which version of the provider was installed. Terraform also creates a lock file named .terraform.lock.hcl which specifies the exact provider versions used, so that you can control when you want to update the providers used for your project.
Create Infrastructure
The terraform plan command creates an execution plan, which allows previewing of the changes that Terraform plans to make to the infrastructure. It is always a good idea to preview the changes Terraform will make to the infrastructure to avoid unnecessary changes to the infrastructure.

Now let’s apply the configuration with the terraform apply command. The terraform apply command creates resources defined in the configuration file.
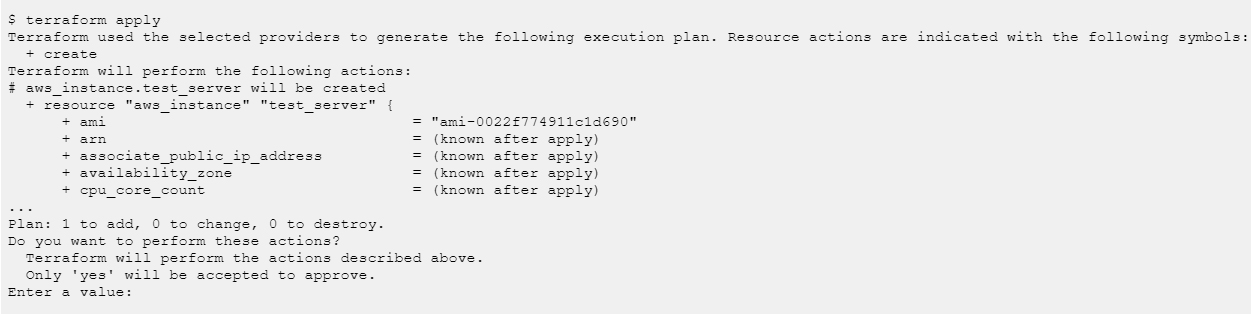
Type “yes” to approve the changes. Terraform starts provisioning EC2 instance(s). Once provisioning is complete, it will display how many resources were added, changed, or destroyed. In my case output was

That’s easy. We have created our first resource using Terraform. Hurray!
Update Infrastructure
Now, let’s modify the resource. Update the configuration file and modify the resource. It’s quite easy with Terraform :).
Edit main.tf file and modify instance tag. I changed the tag from “TestInstance” to “DemoInstance”.
Now execute terraform plan command and preview the changes. If you are okay with changes, execute terraform apply to update the tag.

Now we can log in to our AWS account and verify if the tag is modified. That’s great!
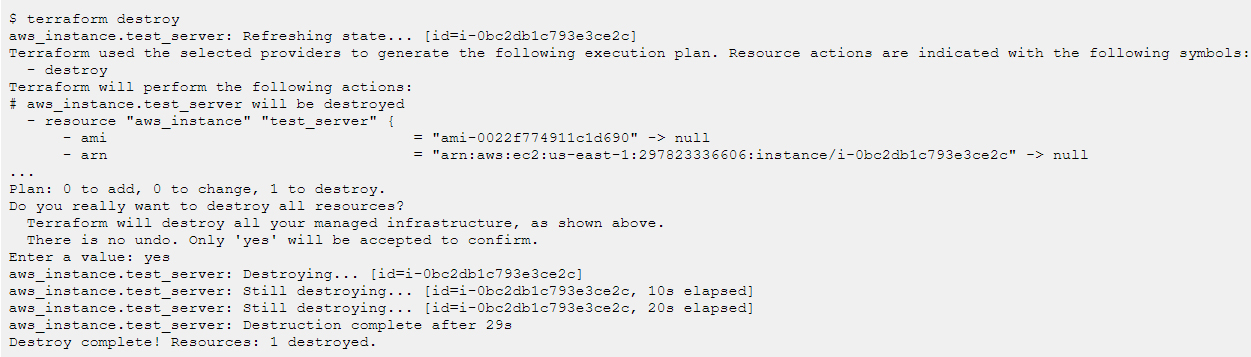
Destroy Infrastructure
Now let’s see how to remove/delete the resources. Use “terraform destroy” command and Terraform will take care of deleting all the resources defined in the configuration file.
Happy Blogging and Happy Learning!
