
Deploy Kubernetes cluster using Pivotal Container Service(PKS) on VMware
By Bikram Singh / Aug 03,2018
Overview
Pivotal Container Service (PKS) is a platform developed by Pivotal team to deploy and manage kubernetes clusters at scale. PKS uses BOSH to deploy kubernetes clusters on cloud providers, as of now PKS is supported on VMware and GCP. PKS uses PCF Ops Manager to deploy kubernetes cluster, post deployment cluster can be managed by usual ways e.g (Kubectl or API etc.)

Ref: pivotal.io
This article will provide steps for deploying production grade Kubernetes cluster on a VMware vSphere 6.5 environment. This article focuses on deployment and configuration, if you are new to Pivotal Container Service, I recommend to go through the PKS documentation first to understand concepts and its architecture. I will not be covering any concepts or architecture in this blog. Refer below for PKS overview and architecture
Prerequisites
To complete this article, you will need below Infrastructure:
* VMware vSphere 6.5(without NSX) Cluster with Datastore on shared storage
* NTP Server
* DNS A record for PCF Ops Manager
* DNS A record for PKS API
* PCF Ops Manager v2.1 OVA for vSphere - pcf-vsphere-2.1-build.335.ova
  [Download Ops Manager](https://network.pivotal.io/products/ops-manager)
* 2 x /24 Network subnets for PKS-INFRA and PKS-SERVICES
vSphere Prerequisites and Resource Requirements
vSphere Version Requirements
PKS on vSphere supports the following vSphere component versions:

Resource Requirements
Installing PKS deploys the following two virtual machines (VMs):

Each PKS deployment requires ephemeral VMs during installation and upgrades of PKS. After you deploy PKS, BOSH automatically deletes these VMs.
To enable PKS to dynamically create the ephemeral VMs when needed, ensure that the following resources are available in your vSphere infrastructure before deploying PKS:

Each Kubernetes cluster provisioned through PKS deploys the VMs listed below. If you deploy more than one Kubernetes cluster, you must scale your allocated resources appropriately.

Ref: docs.pivotal.io
Deploy PCF Operations Manager on vSphere vCenter
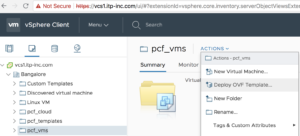
1. Login to vCenter Web client and create below folders
VM and Template Folder - pcf_vms
VM and Template Folder - pcf_templates
Storage Folder - pcf_disk
2. Select the pcf_vms folder to highlight it, and then click Actions > Deploy OVF Template.
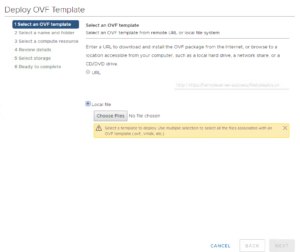
3. In the Select Screen, choose Local file and browse to Pivotal Cloud Foundry Ops Manager for vSphere.ova file that you downloaded and click Next.

4. In the Review Details page, review the details page and click Next.

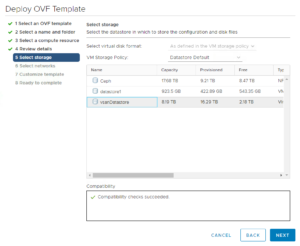
5. On the Select Storage screen, select the vsanDatastore and click Next.
6. In the Networks page, select PCF_INFRA network which created on VDS and click Next.

7. In the Cutomize Template page, provide the following details:

- IP Address: 10.9.85.10
- Netmask: 255.255.255.0
- Gateway: 10.9.85.254
- DNS: 10.9.60.20
- NTP: 10.9.60.100
- Admin Password: <password>
- Confirm Password: <password>
- Custom Hostname: Leave to default or provide a custom name
8. In the Ready to complete screen, review information and click Finish.


Login to Ops Manager and configure BOSH Director for vSphere
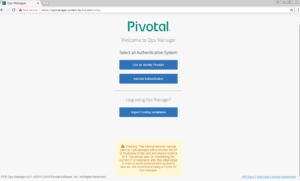
1. Browse FQDN of Ops Manager – https://opsmanager.system.itp-inc.com
2. First time when you start Ops Manager, select Internal Authentication, PCF will maintain user database locally.
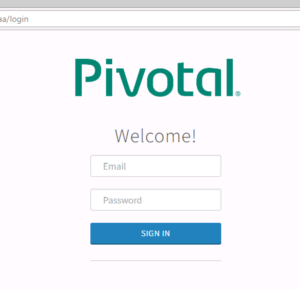
3. Fill the username and password.Enter a Decryption passphrase and the Decryption passphrase confirmation.If you are using an Http or Https proxy please fill in the details.

4. Login to Ops Manager with credentials created in previous step
- In the Installation Dashboard screen, click VMware vSphere tile

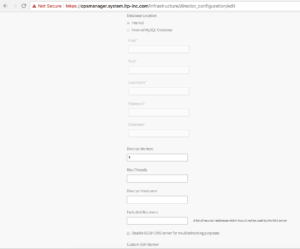
6. On the Settings tab,click vCenter Config and configure as per below
a. vCenter Host: Hostname or IP of the vCenter.
b. vCenter Username: vCenter username with create and delete privileges for virtual machines (VMs) and folders.
c. vCenter Password: Password for the vCenter username.
d. Datacenter Name: Datacenter name from vCenter.
e. Virtual Disk Type: Virtual Disk Type (Thin/Thick).
f. Ephemeral Datastore Names (comma delimited): Datastores to store ephemeral VM disks
g. Persistent Datastore Names (comma delimited): Datastores to store persistent VM disks
h. Select Standard vCenter Networking
i. VM Folder Name: defaults to pcf_vms. Bosh director will place VMs in this folder
j. Template Folder: Defaults to pcf_templates. Bosh director will place VM Templates in this folder
k. Disk path Folder: defaults to pcf_disk. Bosh director will place VM disks in this folder


7. In Director Config configure below:
a. In the NTP Servers (comma delimited): NTP server addresses.
b. Select VM Ressurector Plugin.
c. Credhub Encryption, Blobstore Location, Database Location set to Internal.
d. Leave all other options to default.


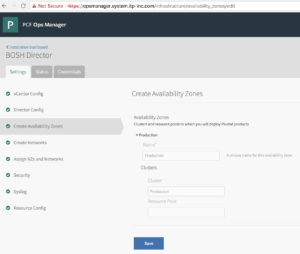
8. In Create Availability Zones configure below.
a. Click Add and configure below
b. Name for the Availability Zone.
b. Type the Name of vCenter Cluster to use as an Availability Zone.
You can add more Availability cluster by repeating above steps, Pivotal recommends 3.
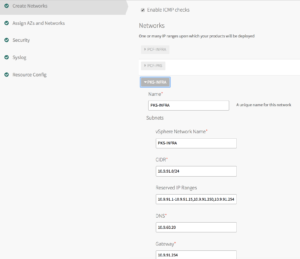
11. In Create Networks configure below
a. Select Enable ICMP checks to enable ICMP on network
b. Click Add Network
c. Type a Name for the network
d. Type vSphere Network Name, it should match the portgroup name in vCenter
e. Type the CIDR of portgroup
f. Type IP addresses that you want BOSH director to exclude while assigning to VMs
g. Type DNS and Gateway IP
h. Select the Availability Zones we added above

12. In Assign AZs and Networks select a Singleton Availability Zone and Network.

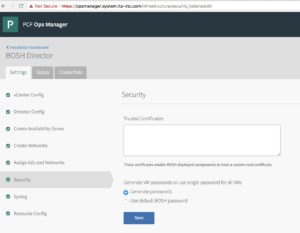
13. In Security leave all to default settings.
14. In Syslog we selected No. if you are using external syslog, Please enter details.

15. In Resource Config leave all to default settings.

16. Click Installation Dashboard to go back to the Dashboard and click Apply Changes to start the BOSH Director installation.
It will take some time to install BOSH director and you can check logs if installation fails

Installing and configuring Pivotal Container Service on vSphere
Adding Pivotal Container Service tile to Ops Manager
In Ops Manager, click Import a Product and select the Pivotal Container Service .pivotal file (pivotal-container-service-1.1.2- build.2.pivotal). Once the file is uploaded click on “+” to add as a tile.

Assign AZs and Networks
Perform the following steps:
- Click Assign AZs and Networks.
- Select the availability zone (AZ) where you want to deploy the PKS API VM as a singleton job.
- Under Network, select the infrastructure subnet you created for the PKS API VM.
- Under Service Network, select the services subnet you created for Kubernetes cluster VMs.
- Click Save.

PKS API
Perform the following steps:
- Click PKS API.
- Under Certificate to secure the PKS API, provide your own certificate and private key pair.
- The certificate you enter here should cover the domain that routes to the PKS API VM with TLS termination on the ingress.
(Optional) If you do not have a certificate and private key pair, you can have Ops Manager generate one for you. Perform the following steps:
a. Select the Generate RSA Certificate link.
b. Enter the wildcard domain for your API hostname. For example, if your PKS API domain is api.pks.itp-inc.com, then enter *.pks.itp-inc.com.
c. Click Generate. - Under API Hostname (FQDN), enter a fully qualified domain name (FQDN) to access the PKS API. For example, api.pks.itp-inc.com.
- Click Save.

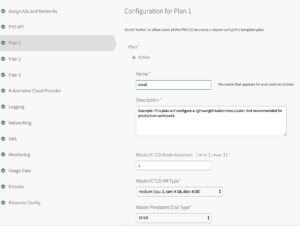
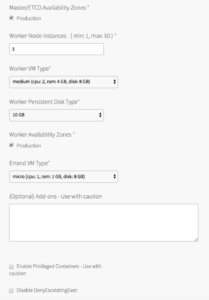
Plans
To activate a plan, perform the following steps:
Click the Plan 1, Plan 2, or Plan 3 tab.A plan defines a set of resource types used for deploying clusters. You can configure up to three plans. You must configure Plan 1. I have created 1 plan with 1x Master/etcd and 3x worker nodes and made other two plans inactive


Kubernetes Cloud Provider
To configure your Kubernetes cloud provider settings, follow the procedure for your cloud provider.
1. Click Kubernetes Cloud Provider.
2. Under Choose your IaaS, select vSphere

For remaining sections Logging, Networking, UAA, Monitoring, User Data, Resource Config and Errands leave the configurations to default.
click on Installation Dashboard to go back and Apply changes
It will take some time(approx. 30 to 60 mins) to install PKS and you can check logs if installation fails.

You can check the status of PKS VM by clicking on Pivotal Container Service tile and then click on the Status tab.

You can check all the credentials by clicking on Pivotal Container Service tile and then click on Credentials tab.

Deploying Kubernetes Cluster
Login to Ops Manager
ssh [email protected] (Password defined during Ops Manager vApp deployment)
Create PKS users to manage kubernetes cluster
ubuntu@bosh-stemcell:~$ uaac target https://api.pks.itp-inc.com:8443 --ca-cert root_ca_certificate
To get UAA admin secret go to Ops Manager > Pivotal Container Service >Credentials > Pks Uaa Management Admin Client
ubuntu@bosh-stemcell:~$ uaac token client get admin -s DT2cFtCOCDU_59KZalqQhxVyy-HjIoGV
Unknown key: Max-Age = 86400
Successfully fetched token via client credentials grant.
Target: https://api.pks.itp-inc.com:8443
Context: admin, from client admin

ubuntu@bosh-stemcell:~$ uaac user add pks --emails [email protected] <password>
user account successfully added
Grant cluster access to new users with UAA
ubuntu@bosh-stemcell:~$ uaac member add pks.clusters.admin pks
success
ubuntu@bosh-stemcell:~$ uaac member add pks.clusters.manage pks
success
Login to PKS using PKS CLI
Install PKS CLI on the workstation from where you want to manage kubernetes clusters using link below
Install PKS CLI
Login to PKS
λ  ~ pks login -a api.pks.itp-inc.com -u pks -k

Password: ********
API Endpoint: api.pks.itp-inc.com
User: pks

λ  ~  ls -l  ~/.pks/creds.yml
-rw-------  1 bikramsingh  staff  2132 Jul 23 06:52 /Users/bikramsingh/.pks/creds.yml
Upon successful login, the PKS CLI generates a creds.yml file containing the API endpoint, CA certificate (if applicable), refresh token, and access token.By default, creds.yml is saved in the ~/.pks directory. You can use the PKS_HOME environment variable to override this location and use creds.yml from any directory.
Creating Kubernetes cluster
λ  ~ pks create-cluster pks-cluster-01 --external-hostname cluster-01.pks.itp-inc.com --plan small


λ  ~  pks cluster pks-cluster-01

Name:                     pks-cluster-01
Plan Name:                small
UUID:                     6283ad5f-cec9-4c75-a2de-2658bf7b5c6e
Last Action:              CREATE
Last Action State:        in progress
Last Action Description:  Instance provisioning in progress
Kubernetes Master Host:   cluster-01.pks.itp-inc.com
Kubernetes Master Port:   8443
Worker Nodes:             3
Kubernetes Master IP(s):  In Progress


λ  ~ pks cluster pks-cluster-01

Name:                     pks-cluster-01
Plan Name:                small
UUID:                     6283ad5f-cec9-4c75-a2de-2658bf7b5c6e
Last Action:              CREATE
Last Action State:        succeeded
Last Action Description:  Instance provisioning completed
Kubernetes Master Host:   cluster-01.pks.itp-inc.com
Kubernetes Master Port:   8443
Worker Nodes:             3
Kubernetes Master IP(s):  10.9.92.16
Verification
λ  ~  kubectl config view
apiVersion: v1
clusters:
- cluster:
    certificate-authority-data: REDACTED
    server: https://cluster-01.pks.itp-inc.com:8443
  name: pks-cluster-01
contexts:
- context:
    cluster: pks-cluster-01
    user: a4452650-22eb-443e-9596-413f8e8dfb92
  name: pks-cluster-01
current-context: pks-cluster-01
kind: Config
preferences: {}
users:
- name: a4452650-22eb-443e-9596-413f8e8dfb92
  user:
    token: eyJhbGciOiJSUzI1NiIsImtpZCI6IiJ9.eyJpc3MiOiJrdWJlcm5ldGVzL3NlcnZpY2VhY2NvdW50Iiwia3ViZXJuZXRlcy5pby9zZXJ2aWNlYWNjb3VudC9uYW1lc3BhY2UiOiJkZWZhdWx0Iiwia3ViZXJuZXRlcy5pby9zZXJ2aWNlYWNjb3VudC9zZWNyZXQubmFtZSI6ImE0NDUyNjUwLTIyZWItNDQzZS05NTk2LTQxM2Y4ZThkZmI5Mi10b2tlbi1uOWhiZiIsImt1YmVybmV0ZXMuaW8vc2VydmljZWFjY291bnQvc2VydmljZS1hY2NvdW50Lm5hbWUiOiJhNDQ1MjY1MC0yMmViLTQ0M2UtOTU5Ni00MTNmOGU4ZGZiOTIiLCJrdWJlcm5ldGVzLmlvL3NlcnZpY2VhY2NvdW50L3NlcnZpY2UtYWNjb3VudC51aWQiOiI3ODNhNzk3MS04ZTY2LTExZTgtOWNjYS0wMDUwNTZiNzUwZTMiLCJzdWIiOiJzeXN0ZW06c2VydmljZWFjY291bnQ6ZGVmYXVsdDphNDQ1MjY1MC0yMmViLTQ0M2UtOTU5Ni00MTNmOGU4ZGZiOTIifQ.gpWNWOhqtLHUUB6hdQkza7F8SoHdXQMXkIby9ZV2RuYUyH_iuXpFXFPpkMOcybfgaYzg9p5Kct6lbmbvMImDTn18CXbqM5q5-iCjhd_FwoJljKrKF2K9nsou6hinwhegHsczzVk5B899df08T5_1hPm7XKG00pMHcBdsU4cmz3yb-fcAlVdWAnEi3yOoFBnsD1y4Iihdw25pZIKBmFK67NDw6mo4lO_MnFwZydQK8R4yd8_FL3hJ6skBaoV-iodPYGDGqFwGyqKifp0ppOr9VH4vKWtdRGPiHZ79m4ZJhBgdNSALzVB4Ol8UkBCIXgXRZTxaSIE1bFMIShAtlokhxQ


λ  ~  kubectl get nodes
NAME                                   STATUS    ROLES     AGE       VERSION
69b50ce5-a5de-475d-86fd-8137478ebc54   Ready     <none>    16d       v1.10.4
6e63e60f-4c81-4a9e-a99c-91b8585cff8a   Ready     <none>    16d       v1.10.4
83345df0-19d2-4681-bec6-b29acd7ad759   Ready     <none>    16d       v1.10.4


λ  ~  kubectl get nodes -o wide
NAME                                   STATUS    ROLES     AGE       VERSION   EXTERNAL-IP   OS-IMAGE             KERNEL-VERSION      CONTAINER-RUNTIME
69b50ce5-a5de-475d-86fd-8137478ebc54   Ready     <none>    16d       v1.10.4   10.9.92.19    Ubuntu 14.04.5 LTS   4.4.0-128-generic   docker://17.12.1-ce
6e63e60f-4c81-4a9e-a99c-91b8585cff8a   Ready     <none>    16d       v1.10.4   10.9.92.18    Ubuntu 14.04.5 LTS   4.4.0-128-generic   docker://17.12.1-ce
83345df0-19d2-4681-bec6-b29acd7ad759   Ready     <none>    16d       v1.10.4   10.9.92.17    Ubuntu 14.04.5 LTS   4.4.0-128-generic   docker://17.12.1-ce


λ  ~  kubectl get cs
NAME                 STATUS    MESSAGE             ERROR
scheduler            Healthy   ok
controller-manager   Healthy   ok
etcd-0               Healthy   {"health":"true"}
λ  ~
λ  ~


λ  ~  kubectl get pods -n kube-system
NAME                                    READY     STATUS    RESTARTS   AGE
heapster-66f995d976-c97nm               1/1       Running   0          16d
kube-dns-64d5ccd66-nvfss                3/3       Running   0          16d
kubernetes-dashboard-684bddbf89-62fr8   1/1       Running   0          16d
monitoring-influxdb-bc594c557-tf8z4     1/1       Running   0          16d
telemetry-agent-77fb94f86-qjs7r         1/1       Running   0          16d


λ  ~   kubectl run nginx-app --image=nginx --port=80
deployment.apps/nginx-app created


λ  ~  kubectl expose deployment/nginx-app --port=80 --type=NodePort
service/nginx-app exposed

λ  ~  kubectl get pods
NAME                         READY     STATUS    RESTARTS   AGE
nginx-app-579d6d7d6b-9p2nn   1/1       Running   0          1m


λ  ~  kubectl get svc
NAME         TYPE        CLUSTER-IP      EXTERNAL-IP   PORT(S)        AGE
kubernetes   ClusterIP   10.100.200.1    <none>        443/TCP        16d
nginx-app    NodePort    10.100.200.13   <none>        80:30637/TCP   45s


λ  ~  kubectl get pods -o wide
NAME                         READY     STATUS    RESTARTS   AGE       IP            NODE
nginx-app-579d6d7d6b-9p2nn   1/1       Running   0          1m        10.200.26.2   69b50ce5-a5de-475d-86fd-8137478ebc54

λ  ~  kubectl describe  svc
Name:              kubernetes
Namespace:         default
Labels:            component=apiserver
                   provider=kubernetes
Annotations:       <none>
Selector:          <none>
Type:              ClusterIP
IP:                10.100.200.1
Port:              https  443/TCP
TargetPort:        8443/TCP
Endpoints:         10.9.92.16:8443
Session Affinity:  ClientIP
Events:            <none>


Name:                     nginx-app
Namespace:                default
Labels:                   run=nginx-app
Annotations:              <none>
Selector:                 run=nginx-app
Type:                     NodePort
IP:                       10.100.200.13
Port:                     <unset>  80/TCP
TargetPort:               80/TCP
NodePort:                 <unset>  30637/TCP
Endpoints:                10.200.26.2:80
Session Affinity:         None
External Traffic Policy:  Cluster
Events:                   <none>
We have exposed nginx-app via NodePort accessible on TCP port 30637. Let check in browser by and going to http://workernode-ip:30637 In our case http://10.9.92.19:30637

Ref : Pivotal.io
